Sri Lanka Telecom is one of the leading Internet service provider in Sri Lanka.
They provide various internet packages and internet accerious for their customers.
Also We are ready to discuss today "How to install Router Configuration for SLT ADSL" However first you want correctly connect Router to PC.
How to connect router to computer
A. Connect phone line from wall socket to ADSL splitter line port
B. Now connect phone code wire from splitter to your phone
C. Connect ADSL router to splitter at Data/modem interface with RJ-11 cord
D. Now connect your PC to router using RJ-45 Ethernet cable
E. Now power on your PC and router
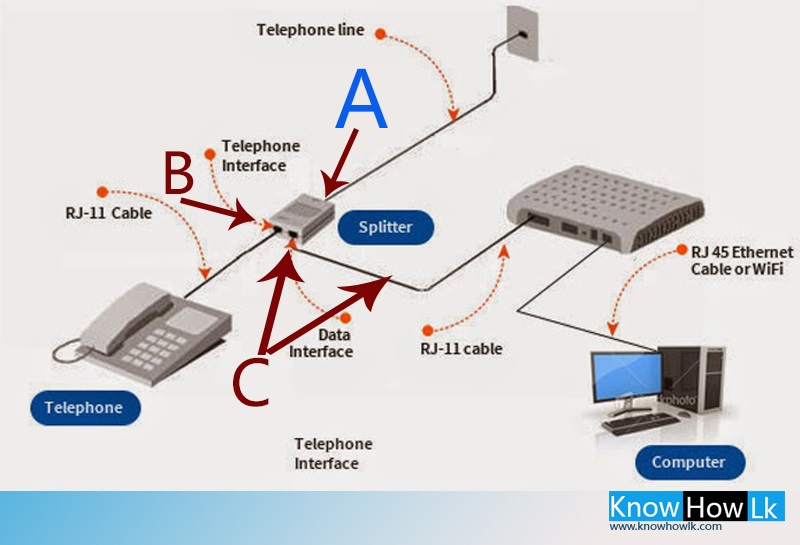
See image - For understanding above steps

How to configuration SLT ADSl router
Here includes the steps for configuring the TP-Link , Prolink H5004Nk , ZTE ZXHN H108L and ZTE w 300 routers.in this article will show you TP - Link router configuration and they match for other router models also
1. Open your web browser (Fire fox, internet explore,chrome,opera)
2. Go to address bar and type 192.168.1.1 and enter
3. Now you want to enter username and password - Select user name and password according to router model (see bellow chart )
1. Open your web browser (Fire fox, internet explore,chrome,opera)
2. Go to address bar and type 192.168.1.1 and enter
3. Now you want to enter username and password - Select user name and password according to router model (see bellow chart )
| Router Model | User name | Password |
| ZTE W300  | admin | admin |
| TP Link  | admin | admin |
| Pro – Link H50004NK  | admin | Password |
| ZTE ZXHN H108L  | admin | $LT@sltbb |

5.Now Include information under the Internet Setting
* Select Virtual Circuit value as → PVC 0
* Next select VPI value as → 8
* Enter VCI vale as → 35
* Now see ISP Option and select → PPPoA/PPPoE
* Enter Service name , Username , and password Under PPPoE / PPPoA Option - (Username and password Should be obtained from your slt service provider )
* Select Encapsulation value as pppoELLC
* If everything is correct Click SAVE Button
See below for further information
See below for further information


6. If everything is correct, the red signal appears in green Within a few seconds - See image bellow

How to configuration wireless network - ZTE router (WiFi connectivity )
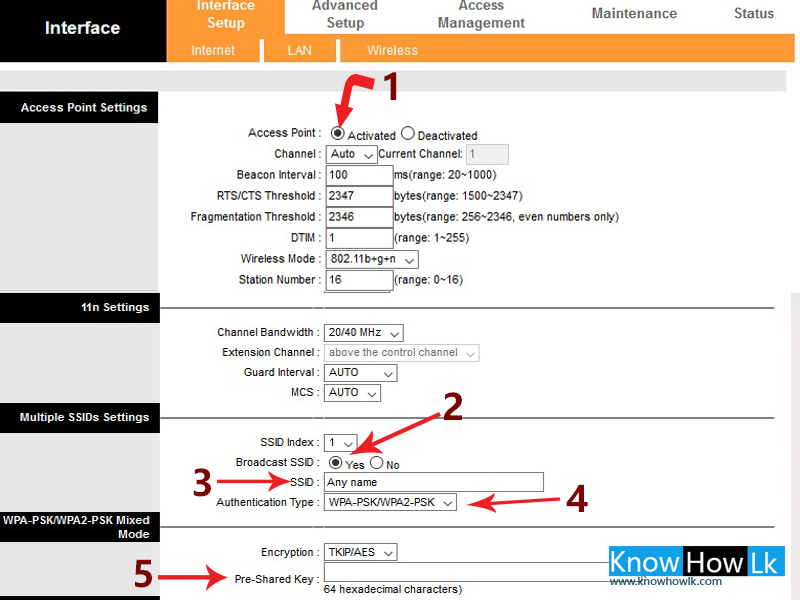
1. Go to Interface setup → Wireless (see image)

2. * Select Access Point as Activated
* Activate Broadcast SSID Select Yes Option
* Type SSID (You can type any name)
* Select WPA-PSK / WPA2 - PSK option under Authentication Type
* Select Encryption option as TKIP / AES
* Type Pre-Shared Key (your wifi password )
* Now Click SAVE Button
See below for further information
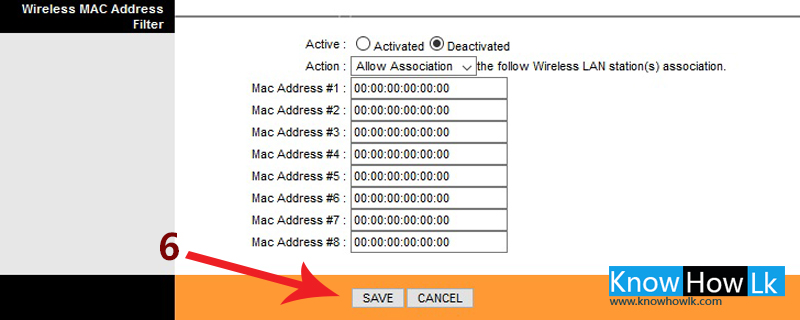
3. Click Maintenance tab now - see image

4. * Select SysRestart under Maintenance
* Select System Restart with option as Current Settings
* Finally click Restart button - See image bellow
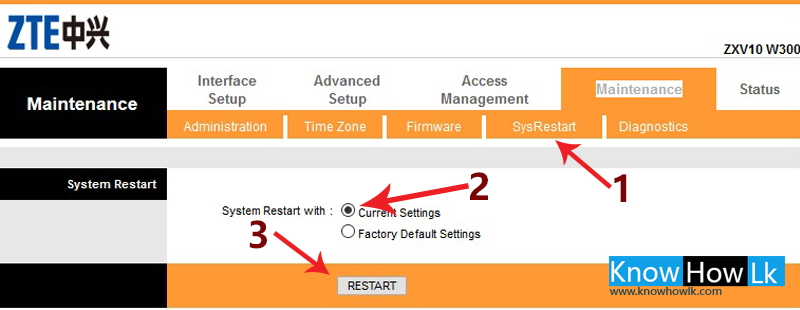
5. Now you can see a restart your router with in few seconds

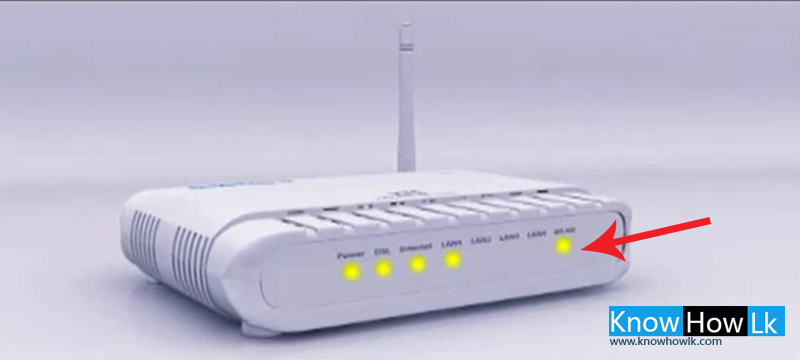
7. Now try to connect with wifi using your laptop or android device
Watch video let's see how to do it again
Other important information
Default Router Username and Password List - according to router model
| No | Router brand | Login ip address | User name | Password |
| 01 | 3com | http://192.168.1.1 | admin | admin |
| 02 | US Robotics | http://192.168.1.1 | admin | admin |
| 03 | Belkin | http://192.168.2.1 | admin | admin |
| 04 | D-Link | http://192.168.0.1 | admin | admin |
| 05 | BenQ | http://192.168.1.1 | admin | admin |
| 06 | Digicom | http://192.168.1.254 | user | password |
| 07 | Netgear | http://192.168.0.1 | admin | password |
| 08 | Thomson | http://192.168.1.254 | user | User |
| 09 | Sitecom | http://192.168.0.1 | sitecom | Admin |
| 10 | Digicom | http://192.168.1.254 | admin | Michelangelo |
| 11 | Linksys | http://192.168.1.1 | admin | admin |

0 comments :
Post a Comment